Live Chat Settings
Click below to watch the Video Tutorial.

Live Chat Settings |
Click below to watch the Video Tutorial.
|
|
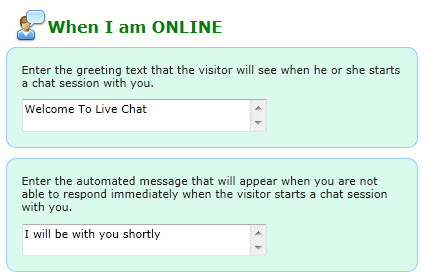
● On the left hand side of your screen is the When I Am Online message settings. Enter the text that would like to display on the Chat Window when you start the chat session with your visitor (as shown in the figure below). ● ONLINE Welcome Text: Enter the text message you would like the Visitor to see when the Messenger Screen opens up for the first time. ● ONLINE Please Wait For Operator text: Enter the text message you would like the visitor to receive if your response is delayed by more than 1 minute. |
|
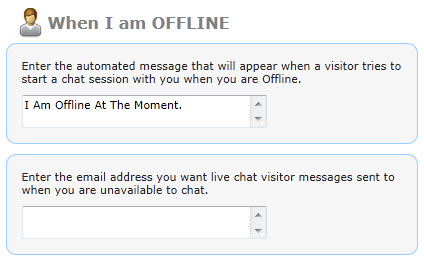
● On the right hand side of the screen are the OFFLINE message settings where you can update the text that the Visitor will see when you are offline (as shown in the figure below). ● OFFLINE Message: Enter the Offline message that you would like your visitor to see when you are not logged into the System or Live Chat. ● Email Address Where Offline emails are to: Enter the email that you want to receive queries on from site visitors when you are offline. |
|
● Below the Online / Offline Message are settings that can be customized as per your requirements. ● Turn off Chat Alert Sound: Checking this checkbox will turn off the chat alert sound. Un-checking will turn on to the chat sound. ● Turn off Chat Optional pop out Form: Checking this checkbox will turn off the optional pop out form that the visitor is required to submit before the chat session is initiated with you. If the checkbox is unchecked the Visitor will have to submit the form to be able to chat with you. The optional pop out form can also serve to gather visitor information and follow up if required. ● Show Me as Offline: Checking this checkbox will show you as offline even if you are logged into your back office.
|
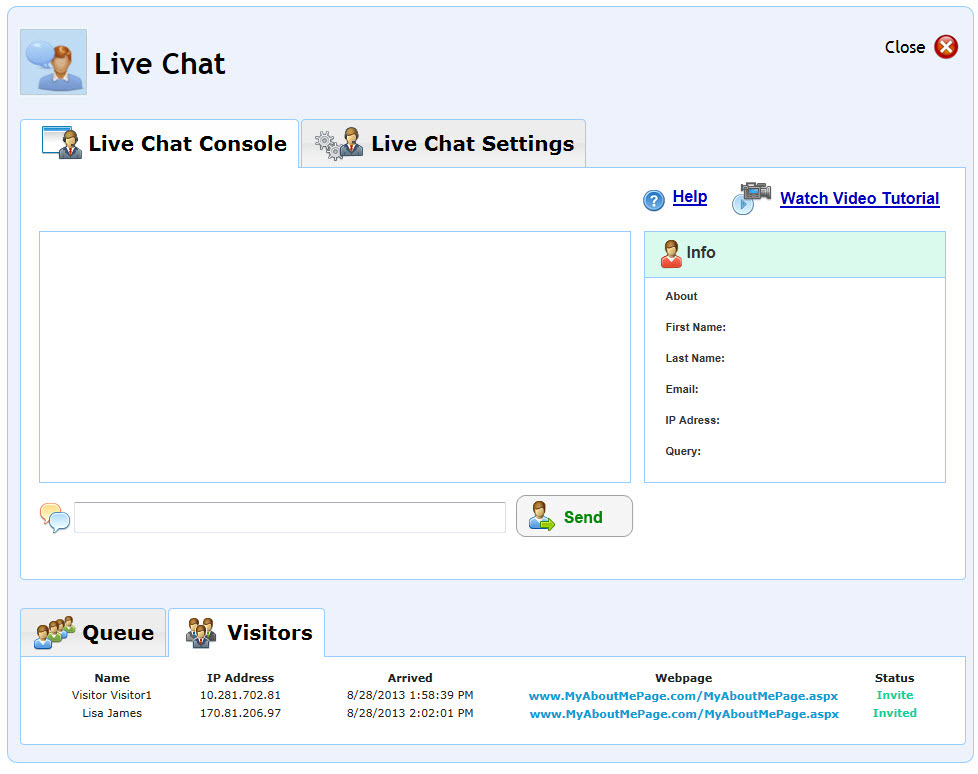
● The Live Chat console is the window through which you will communicate and interact with your website visitors. The Live Chat Console has the Queue / Visitors Tab at the bottom of the window and the Info tab at the right.
● Visitors Tab: This tab will show you all the visitors that are currently browsing your web site. The status Column will display either Invite or Invited. If a visitor has already been invited the status will be Invited. Once the Visitor accepts the chat, the Visitor will be moved to the Queue tab. If a visitor has not been invited he will remain in the visitors tab. Visitor are identified as Visitor 1, Visitor 2 and so on.

● Queue Tab: This tab will have a list of Visitors who are chatting with you. A Member can initiate chat from the Visitors tab or the Visitor can initiate chat on the Member’s web site by clicking on the Chat Icon. The Status on the Queue tab would have two listings – Chatting and Accept.

● Accept status is for those visitors who have initiated the chat on the website, but you have yet to accept the chat invitation.
● Chatting status is for those visitors who are currently chatting with you.
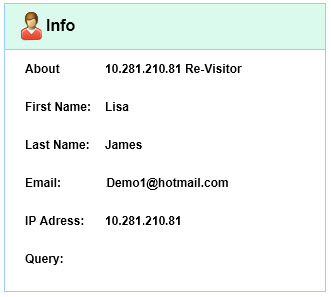
● Info Tab: The Info tab on the upper right hand corner of the Chat Console displays the information for the Visitor with whom you are currently chatting with. To display the information on the Info tab, click the name in the tab on the left hand corner of the screen.