How Do I Use Live Chat on My Website? |
|
As per current market scenarios and growing trends,
Live Chat has been introduced as an integral part of the Lead Capture
System to strengthen and optimize your sales and marketing. The Live Chat
application has been integrated into the current system, so you don’t
have to go through the pains of installing additional software. Just by
logging into the system and making a few settings updates in the back
office, you can start interacting online with your MyAboutMePage.com website
visitors.
Adjust Your Live Chat Settings
Before adding Live Chat to your MyAboutMePage.com website,
you should review and adjust your live chat settings. To adjust your Live
Chat settings, click Sales Tools on the main menu and then click the Live Chat link. A new window or
tab will open for Live Chat. Click the Live
Chat Settings tab in the Live Chat window.
The Live
Chat Settings screen is where you set how the system will respond
to the interaction between you and your visitor. Note: The System Admin
can lock these settings so the Member is not allowed to update the settings.

|
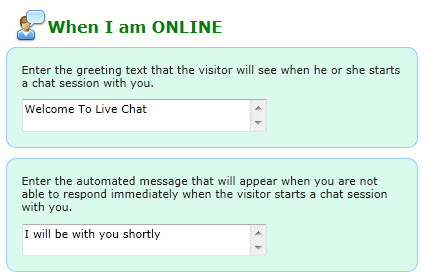
● On the left hand side of your screen is the
When I Am Online message settings. Enter the text that would like
to display on the Chat Window when you start the chat session
with your visitor (as shown in the figure below).
● ONLINE Welcome Text: Enter the text message
you would like the Visitor to see when the Messenger Screen opens
up for the first time.
● ONLINE Please Wait For Operator text: Enter
the text message you would like the visitor to receive if your
response is delayed by more than 1 minute. |

|
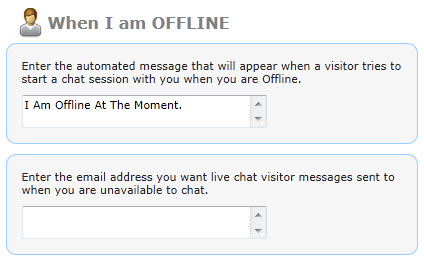
● On the right hand side of the screen are the
OFFLINE message settings where you can update the text that the
Visitor will see when you are offline (as shown in the figure
below).
● OFFLINE Message: Enter the Offline message
that you would like your visitor to see when you are not logged
into the System or Live Chat.
● Email Address Where Offline emails are to:
Enter the email that you want to receive queries on from site
visitors when you are offline. |

|
● Below the Online / Offline Message are settings
that can be customized as per your requirements.
● Turn off Chat Alert Sound: Checking this checkbox
will turn off the chat alert sound. Un-checking will turn on to
the chat sound.
● Turn off Chat Optional pop out Form: Checking
this checkbox will turn off the optional pop out form that the
visitor is required to submit before the chat session is initiated
with you. If the checkbox is unchecked the Visitor will have to
submit the form to be able to chat with you. The optional pop
out form can also serve to gather visitor information and follow
up if required.
● Show Me as Offline: Checking this checkbox
will show you as offline even if you are logged into your back
office.
|
Once you have completed your settings updates, click
the Submit button to save your
updates.
Enable Live Chat on Your Site on Manage Site
After you save your settings, you can enable Live Chat
for your site on the My About Me Page
screen. Click Sales Tools on the
main menu, then click the Manage My Site
link to go to the My Website
screen. On the My Website screen,
click Configure My About Me Page
link.
● To enable Live Chat for your About Me page, check the
Enable Live Chat checkbox and
click the Save Live Chat Settings button.
Live
Chat Console
After you enable live chat, go back to the Live Chat
window and click the Live Chat Console
tab.

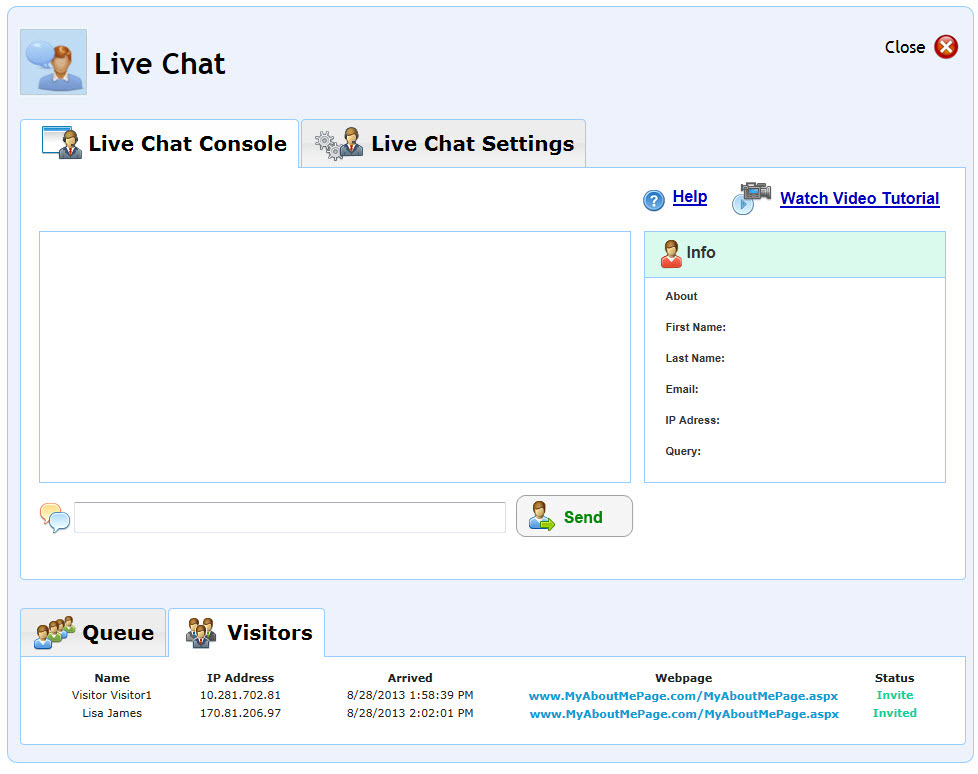
● The Live Chat console is the window through which you
will communicate and interact with your website visitors. The Live Chat
Console has the Queue / Visitors Tab at the bottom of the window and the
Info tab at the right.
● Visitors Tab: This tab will show you all the visitors
that are currently browsing your web site. The status Column will display
either Invite or Invited. If a visitor has already been invited the status
will be Invited. Once the Visitor accepts the chat, the Visitor will be
moved to the Queue tab. If a visitor has not been invited he will remain
in the visitors tab. Visitor are identified as Visitor 1, Visitor 2 and
so on.

● Queue Tab: This tab will have a list of Visitors who
are chatting with you. A Member can initiate chat from the Visitors tab
or the Visitor can initiate chat on the Member’s web site by clicking
on the Chat Icon. The Status on the Queue tab would have two listings
– Chatting and Accept.

● Accept status
is for those visitors who have initiated the chat on the website, but
you have yet to accept the chat invitation.
● Chatting status
is for those visitors who are currently chatting with you.
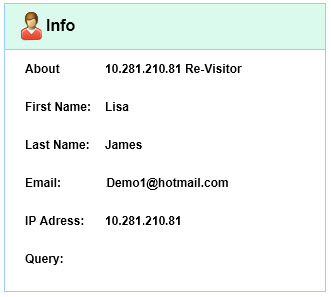
● Info Tab: The Info tab on the upper right hand corner
of the Chat Console displays the information for the Visitor with whom
you are currently chatting with. To display the information on the Info
tab, click the name in the tab on the left hand corner of the screen.

You can chat with multiple Visitors at the same time
with tabbed conversations. To chat, all you have to do is insert the text
message and click on Send button. You can continue the chat session with
other Visitors just by clicking on the tab with the visitors name at the
top.
Live Chat Alert
 If you are
in the back office but do not have the live chat console open, the system
will notify you if a site visitor requests a chat. Wen a visitor requests
a chat, the chat sound alert will sound and Visitor
Requests Chat! will appear in the back office header. You can click
Visitor Requests Chat! in the
header to open the live chat console.
Live
Chat Details
If you have chatted with a visitor who is a Contact
in your back office, you can review your chat in the Activity section
of the Contact
Details page for that contact. Click the Live
Chat Session link in the Activity table to view your chat conversation.


